Your Closet Can Look Like This Too! You Got This!!
- Sep 17, 2025
- 9 min read
Updated: Nov 10, 2025

FLASHBACK TO 2021
Video From 2021 At The Bottom
My all time favorite DIY in my life is definitely my Ikea Pax Closet! I designed this layout myself using the Ikea Pax Planner (which they changed the format to completely in the middle of my planning, so I had to start over - le sigh)....but then, I did it and I built it all by myself! If you've been thinking about updating your closet, you can do it!! I got tons of inspiration online from other peoples Ikea Pax closet journeys and that is why I am starting this Blog - maybe I can help you too? Now I will never claim for everything you see here to be perfect, because it's totally not, but it's real and hopefully that counts for something.
OK, here we go - Start with the planning!! So, first thing's first - you need to measure! This needs to be absolutely perfect measuring...something I'm not always good at. My first issue was I started planning my Pax closet when only the studs were up and didn't realize quite how much of a difference the drywall would make all around. I worked and worked on the perfect design, only to be devastated later when the walls went up and I realized it wouldn't fit. I was crushed. I ended up having to redo everything and was trying to maximize the space without losing inches in between units or at the ends. I ended up having 8 extra inches of space on one wall and about 10 inches of space on another. Although it wasn't exactly what I had originally planned and I ended up with some blank space behind units, it all worked out in the end and I couldn't be happier!
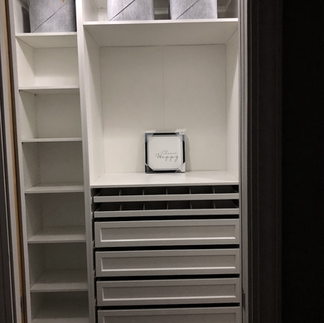
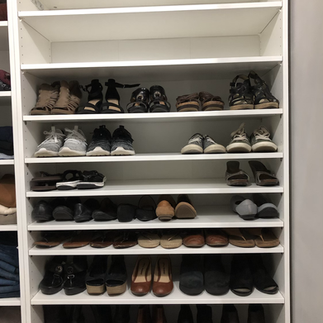
So, as far as planning what I wanted out of the closet, my main thing was that there was a man's section and then a woman's section for me. Insert your own preference, man/man, woman/woman, ideal here, but you get the idea. :) For each partner's section, I wanted the largest Pax Unit, the 39.5" x 22" x 93", to be that person's "dresser". Lots of big drawers, jewelry/watch/tie trays and an open "dresser" top with more shelves above. The rest of my closet was built around this - well this and a large space for my shoes!
So as much as I wanted this, I was terrified to start it! My sister kept telling me, you can do it!! So, she came into town for Thanksgiving and she went with me to IKEA to buy my first piece. I called this my "practice piece". It was the smallest piece that I needed and therefore, the easiest to build. I figured I would see if I could do it and how hard it was, and if I felt confident, I would buy another piece and another. I figured if all else failed and I got defeated, I could always put the pieces in the garage for storage units. But I didn’t…and I did it!! AND IT WAS EASY!!! I honestly have to say that the hardest part of building your IKEA Pax closet will be getting it out of the stupid box!! I never did come up with a system for that, because I was afraid to use a knife as I might damage the pieces. Anyways, my sister went with me that first day to IKEA and we bought that small piece. I never thought it would fit in my car without having to bungee the trunk closed. (I have a Honda HRV by the way). And if you can believe it, the trunk closed and everything!!

Now, my sister had to sit in the back seat on the way home of course, as it went literally from the trunk to the front windshield up over the dash, but it fit!! Lucky for me we have a new IKEA that is only about 20 minutes away! :) And that’s where it all started. Before I knew it, I was ordering two pieces at a time for pick up, because I didn’t want to overload my dashboard down too much! And then, just like that, I realized you can order online and it only cost $50 to have it delivered!! All of it!! All of the rest of it!! Because I had so many pieces, I actually ordered two more separate big orders, because I didn’t want to overcrowd my new bedroom with boxes...or overwhelm myself! It was an adventure for sure! An exhilarating one!
For the most part I did everything all by myself and I was so proud of that! This was MY mission! I only had to call my best friend once to come over when I was building the big unit because I couldn’t get the side piece on by myself. I think I was exhausted, but I couldn’t give up. For some reason when I built the next big one like that, I had no issue at all doing it by myself!
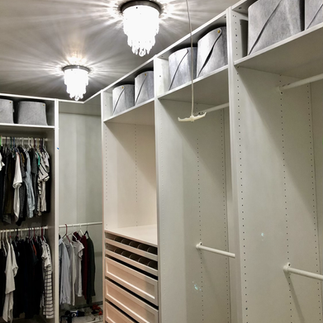
Just a few pics of the progress and me figuring stuff out along the way....if only I'd known I was going to be sharing these online, I would have taken better pictures! But I can't predict the future, so...


A Few More From The Beginning.


A Few Newer Ones...


Oh, and Super important...I was able to build these on the ground and then lift them up into place. If I had to build them standing up there’s no way I could’ve done it on my own. PLUS, very important, if you have don’t have enough ceiling clearance, you have to build these standing up or you won’t be able to push them up and get them into place, because they will hit the ceiling! Check all of IKEA’s information on that!!
Also, because I had so many pieces, (11 pieces - my lucky number by the way), it was a bit of a puzzle making space to build them and then rearranging them throughout the process, so that I could keep having the space to build them and again, rearranging them into place at the end. I cannot believe my lights still work, as I must have bashed them with the units about 10 times during the process!! I also used all that cardboard packaging that my pieces came in to build them on. I laid all of the cardboard pieces out flat so that I wasn’t working on the tile so that I had something a little more cushy to work on. So I guess all that packaging came in handy, after I tore it apart to get it open - ha!
This was so not a rush job for me. Once I actually truly got started it took me over a month to do it. I didn't want to overwhelm myself and just did this on the weekends here and there and sometimes at night after working all day, if I was motivated enough. This didn't bother me as I was technically moving in from my old bedroom in the original part of the house and my clothes did not have to be rehomed until it was complete. So, I did what I could, when I could and the finished product still wows me every single time I walk into the closet!! You can do this too! I promise! Put on your big girl panties and go and buy that first piece and do a test piece!
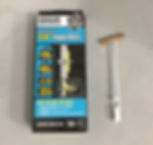
As far as finishing the closet off. The drawers are easy to build and don't take too terribly long. I did this while watching TV after work at night. When I was placing the shelves, I ordered these shelf brackets to start with shown below, as I learned that the Ikea shelf brackets have to be screwed in, and I didn't want to do that until after I was totally sure that was where I wanted them. I mostly thought this was imoortant for the shoe area. I still have plenty of the "easy to remove or move" brackets left in for now, as I'm still organizing. I ordered the 25 pack first and then ordered a 50 pack. You have to remember that each shelf takes 4 of these and I have a lot of shoe shelves!
50 Pack:
25 Pack:
Also very important - securing your Pax units to the wall and to each other for stability. This is so very important. My dad, kept saying, "they're so heavy, I'm sure you don't need to do that"! But there was no way I was jeopardizing my new beautiful closet falling apart! My dad and brother helped me secure the first few together, to boost my confidence, and then I finished it up by myself. You actually have to use a drill bit to drill through from one unit to the next unit, drilling through the premade hole (which does not go all the way through). You have to make it go all the way through!! This was a little bit scary at first, but you get the hang of it. IMPORTANT! Try to put these connector screws in a place where you do not want a shelf! After I did a few, I think I started doing them in the same spot on each one - four holes down from the top and four holes up from the bottom. Sometimes I even had to add a third one in the middle if it was gaping a little bit.
I also then secured the frames to the wall, all by myself, using these nifty super heavy duty anchors, that I saw other Pax Parent's using. Yes, I am a Pax Parent - LOL - and this closet is my baby!! This requires drilling an extremely large hole into your wall, which freaked me out, but again - once, you do the first one or two, you get the hang of it!
Pack of 10:
I also saw some others buying stickers off of Amazon to cover up the cam locks and these are the ones that I purchased. Oh, and some people painted the silver screws to match too! I never got that far! I did however caulk in the teeny tiny little holes in the base of the units eventually.

These are Stickers that cover the large screws...
One of the BIGGEST GAME CHANGERS was these little pain in the arse's. Your fingers will bleed, but it is worth it. I eventually started using the flat edge of a pair of needle nose pliers to push them in. There were thousands of these little menacing holes. THOUSANDS. I started with the ones you could see and a glass of wine. Eventually, over time, I filled in the majority of them - however, I'm not gonna lie, I never did finish...here's a picture of some filled in holes and the link to those little buggers.


Also, something else to note, I have an attic pull down ladder in my closet. Underneath this area I had to make sure that I use the shorter unit, so that I could still open that attic ladder. Also very important! I had to make sure that the units across from the ladder were in the right place so that the ladder wouldn’t hit the edge of one of the units when pulling it down. So when I pull down the ladder, I actually have to move the clothes in that unit to the side to make it work…BUT, when am I ever going up there right? So this wasn’t a huge issue for me but I did have to make sure that it worked when needed. Here are a couple of pictures that show the attic pull down.

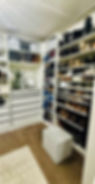
Also, since there was going to be SO much white in the room from the units, I painted both the ceiling and the walls all one color - Valspar, Filtered Shade - just to give the room a little more interest!
Now that you know the basics, here is a final video from 2021!
Here are some extras....
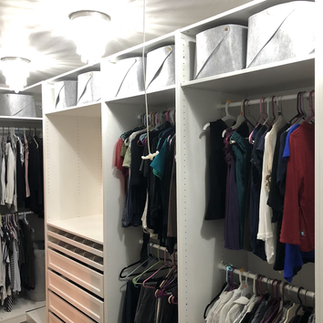
The gray baskets are all from Ikea and I LOVE them!! Here is link to those.

Gray Baskets:
Lights Fixtures - currently not available
Similar Light Fixture
The PAX Units I used:
For The "Dressers"
39 3/8 x 22 7/8 x 92 7/8 - For The "Dressers"
Solid Shelves For 39 3/8" Units
Glass Shelves For The Top Of The Dresser
Pull Out Tray
Inserts For Pull Out Tray
Divider For Pull Out Tray
Drawer With Fancy Front
For The Hanging Clothes Areas
29 3/8 x 22 7/8 x 92 7/8 - For The Hanging Clothes Areas
The Rods For The 29 3/8" Units For The Clothes
For The Rest
Corner Unit
Smaller Unit
These Are Smaller Depth Than The Others
Smaller Unit Shelves
These Are Smaller Depth Than The Others
Smaller Unit Drawers With Fancy Fronts
These Are Smaller Depth Than The Others
The Short Unit For Under The Attic Pull Down - For Shoes
These Are Smaller Depth Than The Others As Well
Shelves For The Shorter Unit - For Shoes
These Are Smaller Depth Than The Others As Well As Shorter
