Well Hello Beautiful!
- Dec 28, 2025
- 7 min read
Updated: Jan 16

One of my favorite parts of the Addition was getting a second bathroom!! And oh, what a bathroom it is. I cannot tell you how happy a second toilet makes me, LOL, even if I have to now clean two of them, instead of one.
I wanted the bathroom along the back of the addition, because I knew we got the best sunlight back there in the mornings. At first, I didn't think we were going to be able to make it fit this way. Mick made the floor plan work with suggesting the closet on the side of the house, so I got to have the bathroom along the back. It took like a hundred drawings to get the floor plan right. Literally. We work well together and mostly agree on choices like: colors, tile, faucets, etc. Thank God! Otherwise, life would have been much more difficult!
The Vanity
In planning out the Primary Bath, I started looking at Vanities and about died when I saw the prices! How were we ever going to afford a vanity the size we needed to fill the space?! Then of course, my shabby chic side kicked in when I started seeing people making vanities out of dressers. I can do this. You did it, so I can do it too right? Absolutely!! Well, with a little help from a wonderful woman on Craig’s List I could! I started looking. I wanted something old, that had character. And then I found this one! And it was perfect and the size was right, and it was gorgeous, and she had already spruced it up and repainted it! And it was wayyyyyy cheaper than any real vanity that size that I’d liked online.
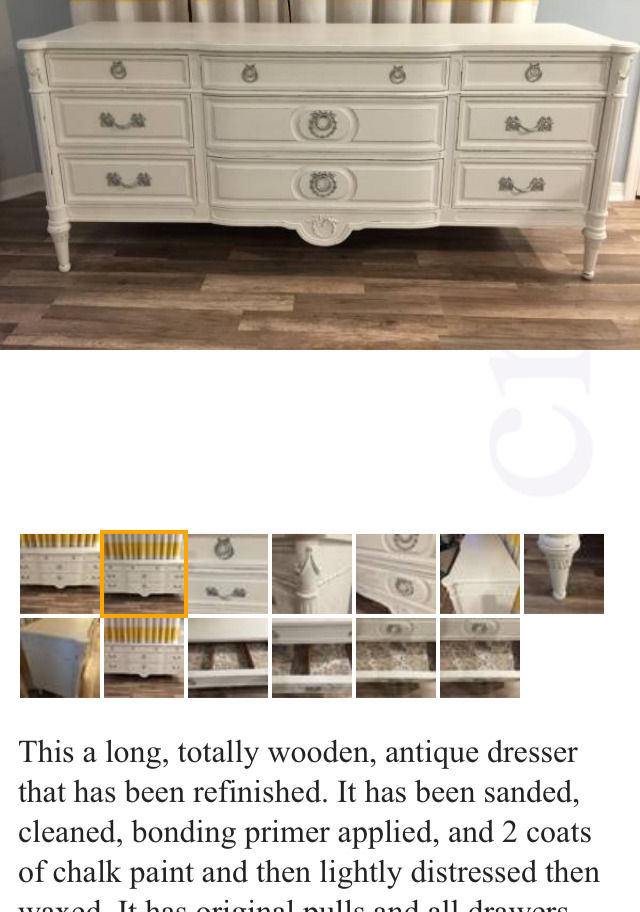
So we bought the vanity from the woman on Craigslist and we also bought two nightstands for our new bedroom! She had tons of stuff that she was repainting and selling. It was the perfect piece!
After looking at other people's dresser / vanity concoctions, I realized that I need to paint some kind of protective clear coat over the top of the vanity to make it hold up around all of the water that would be splashed all over it! By combing the internet and reading someone else's blog, I found some stuff that would make it "water resistant", maybe even "waterproof"? It's called Polycrylic. The water resisting miracle worker, that will also try to kill you as you paint it on and breath in the fumes. Seriously, wear a mask people!! I felt like I almost died. I started having a wicked panic attack and had to call my best friend to come over and sit with me until I felt better. Panic is no joke! Prevention is key! Wear a mask!!! Also, very important - You are not to shake this product! I cannot remember why, but do not shake! You are apparently allowed to very gently stir it, but that is it. I did paint on five coats before I about passed out, so I figured that was good enough. After I did the top, I realized maybe I should have done the whole thing, but I didn't want to! So I didn't, LOL.

I got the vanity mirrors from Ikea. I love these, because they mimic the shape of the tub. I had to paint these white as they only came in black. Easy peasy...I was a painting pro by now! Next, I started looking for sinks. The easiest choice was the vessel sink and I actually found some for a really good price at Lowe’s! I found the faucets on Amazon and they were also a really great price and on top of that, I absolutely loved them!! So being new to all of this, I thought that we would have to install the sink and the faucets, but the plumber said, nope, we do all of that. Phew! Relief! I think that the vanity overall turned out amazing!! And even though I decided to cut up the vanity drawers, alone and unsupervised, to make them fit around the plumbing, they still all function! Some better than others, LOL. However, we still need to tighten those up a bit one day! It’s on the list.


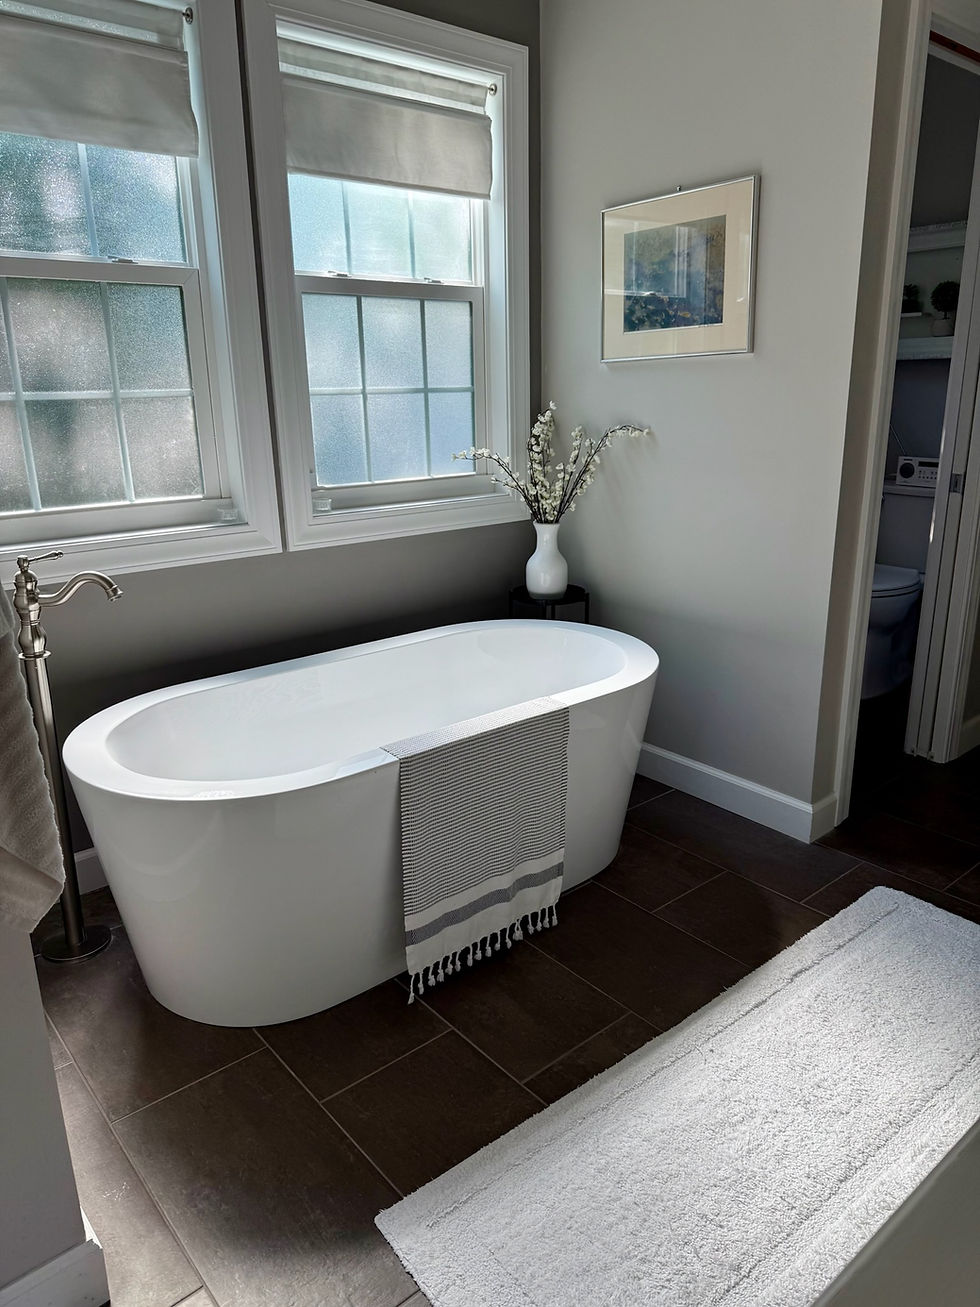
The Tub
Next up, the tub. My goodness, what a beautiful thing our tub is! So my specs for that were no center drain. I wanted it offset. The second requirement was I wanted a ledge around the outside of the tub so that if you’re taking a bath, you actually have a place to set things. And the last requirement was to be able to actually sit in the tub and stretch your legs out. I didn’t want to be cramped up in there and I didn’t want the drain hole in my bum!! Hence, the offset drain.


The Toilet Room
The Toilet Room is spacious, thanks to designing it with a pocket door. I also wanted a window in here that I could see out of! You can't see out anywhere else on the back of the house. I also love having the trees in the back yard reflect in the mirrors in the morning. I usually see squirrels and birds while I'm getting ready. I have a cute little half curtain in there that was gifted to me from my friend Kathy. I love it! I can see outside, but still have privacy.
The Toilet - People, just get the toilet you want. Don’t try to impress others or do something for resale. I am short! Why did I buy the comfort height toilet?! I’m not tall and that toilet is for tall people! I sooooo wish I had the short toilet! Le sigh...
OH! And, I also repurposed a giant glass jar that my best friend Tami gave me to use as a toilet paper holder for the toilet room. It's super cute and a fun way to stash your toilet paper and girly things.


The shower
The shower. We definitely wanted the shower to be a decent size and I wanted a little bench in there to make shaving my legs easier and using the pumice stone on my feet easier. And I wanted the handle on the wall closest to you so you didn’t have to get in the shower to turn it on and get all wet. It was pretty simple, especially knowing that I already wanted traditional white Subway tiles and something a little more dressy for the floors and niches. These all came from Home Depot and were both very affordable. Finding the perfect grout color, was another story. I scoured peoples webpages, like this, to see what everyone else’s looked like. Did I want gray? Did I want white? Did I want black? After much online research, I chose the color, Mapei's Warm Gray. And that was that! Now, the little niches in the shower were a different story. When the guys were building it out, I hadn’t gotten to tell them exactly what I wanted yet and they kind of already cut the hole out when I came home from work one day, so I had to work with what was there, but I was able to change it just a little bit. It’s maybe not exactly how I wanted it, but it worked just fine for my needs once I switched up the shelf heights.


The Armoire:
Did you see my armoire? Do you love it as much as me? I LOVE it! Again, I like the idea of using old furniture for a different purpose than originally intended. This was another copy cat of something I’d seen online - only I changed the inside color to our accent wall color. This thing about killed me. Whilst carrying it up the front steps (I thought this was the hard part), we did great! Made it up the steps! It was only when setting it down inside, placing it on the cardboard, that I’d carefully laid out to set it on, that I tripped on the cardboard and dropped my end. It landed right on top of my foot!!! OMG did that hurt. But the worst part was, I was set to go on a cruise with my sister about a week later. I thought I’d be in a wheelchair for sure. Turns out, a boot worked just fine and there was no way I wasn’t going on that cruise! I would do whatever it took…wheelchair, boot, you name it! Anyways back to the story…
So this thing lived in our living room for weeks while I slowly repainted it when I had time. It was in the living room, so that I could watch TV while I painted it.


So It might look weird from this angle, but tucked away next to the armoire is my Dyson, my little fan and my scale. Typically, you can't really see these unless you're walking by, but I like that they are there, but just kind of hidden away.
Subscribe and be notified of my next post!
Follow along for more.
Lisa xoxo
Links to the stuff I used and bought are below. Sadly, because I've waited so long to post these, a lot of them are no longer available, so I'm adding in similar items. Also, Please make sure to measure for yourself, as my stuff may not work for you, but also as I've already admitted, I'm a horrible measurer!
Tub - Sadly not mine. It says currently unavailable so I looked and found this one. This one doesn't have the larger rim, but it does have the offset drain and the dimensions are similar.
Tub Option # 2 - This one is the same brand and a more similar size to mine, but it has the center drain.
Tub Filler: Mine is not available. This is a similar one, but it's not quite as vintage looking as mine.
Vanity Mirrors - I painted these white!
Vessel Sinks - Mine were Aquasource from Lowes, but they no longer sell them, so here's something similar in shape, but a bit larger than mine.
Sink Faucets - Mine are currently unavailable, but these are just as perfect and almost identical!
Vanity Waterproofing Polycrylic - this is the exact one that I used!
Handheld Shower & Shower Head Combo - Mine was Glacier Bay, but not available. This is similar.


Comments